If you use Airtel, you might occasionally need to access the settings for your router. Perhaps you want to configure port forwarding, change your Wi-Fi password, or fix connectivity problems. For whatever reason, you can easily log in to your Airtel router using any device that has an internet connection.

We’ll walk you through the process of logging into your Airtel router in this blog. We’ll go over everything you need to know, including how to enter your login information and locate your router’s IP address. Additionally, we’ll go over some typical problems that might keep you from logging in and how to fix them.
By the end of this tutorial, you’ll be able to access your Airtel router settings with confidence and modify your network as you see fit. So, whether you’re a tech-savvy user or just getting started with home networking, let’s dive in and learn how to login to Airtel router.
How To Setup Airtel Router?
The process of setting up an Airtel router is quick and simple, and it only takes a few minutes to complete. Unpack the router first, then put the battery in. After that, turn on the router and join its Wi-Fi network with your device.
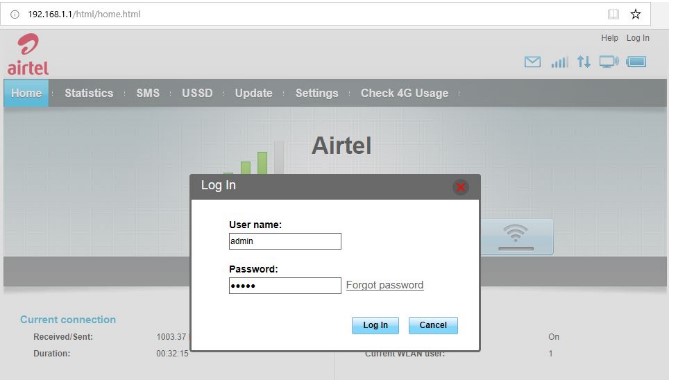
To access the router’s settings page, launch a web browser and type “192.168.1.1” into the address bar. To log in, use the default username and password. Then, change the settings to suit your tastes.
Changes can be made to the SSID and password, security settings, and advanced configurations like port forwarding and DMZ. Prior to leaving the settings page, don’t forget to save your changes
How To Setup Airtel 4G hotspot Router Configuration WiFi Router?
The full instructions for setting up and configuring your Airtel 4G WiFi hotspot router are provided below:

Step 1: Remove the packaging from your Airtel hotspot router and open it up so you can put the battery in. Make a note of the details printed on the battery because you might need them in the future.
Step 2: Turn on your Airtel hotspot router, then wait while it boots up. On the router’s screen, the network name (SSID) ought to be visible.
Step 3: Open your laptop or other device and perform a Wi-Fi network search to see if there are any networks you can connect to the router with. You should see the network name (SSID) of your Airtel hotspot router displayed in the list. Connect to it.
Step 4: You will be prompted to enter a password. The password for your Airtel hotspot router is typically printed on the back of the gadget. Enter the password and connect to the hotspot.
Step 5: Once your device is connected to the hotspot, open a web browser and enter “192.168.1.1” in the address bar. You will then be directed to the login page for the Airtel router.
Step 6: Enter the default username and password for the Airtel router. Once more, you should find this information printed on the router’s back or in the manual that came with it.
Step 7: Once you’ve successfully logged in, you’ll see the home page of the Airtel hotspot router’s settings. Here, you can change a number of settings, including your Wi-Fi network’s SSID and password, security settings, and advanced settings.
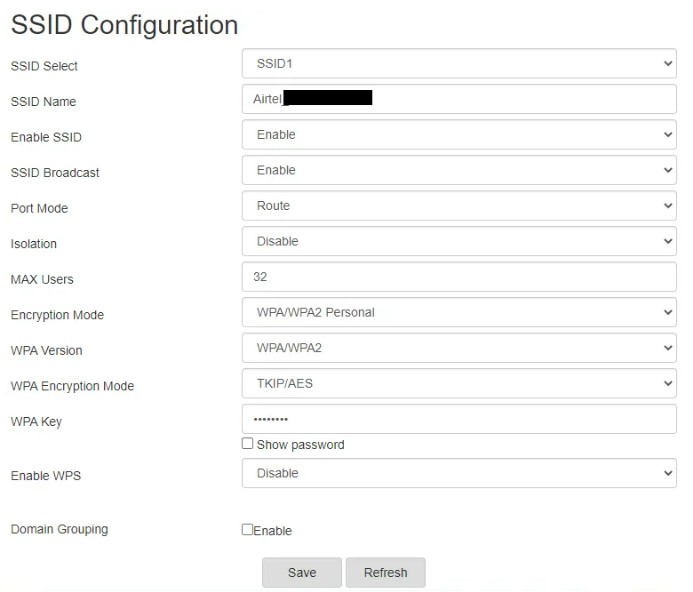
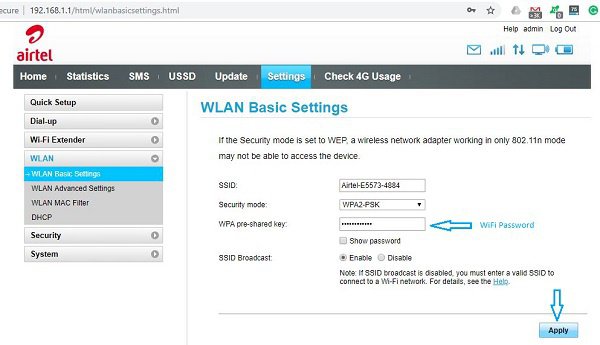
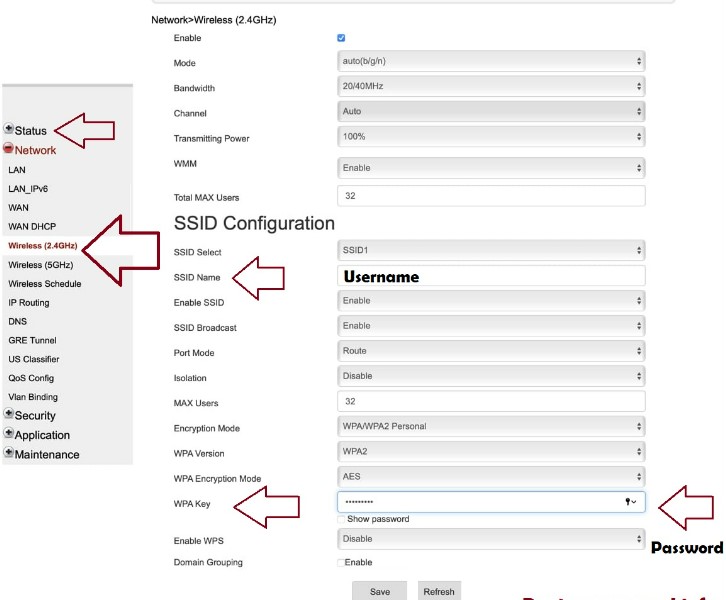
Step 8: To change the SSID and password, click on the “Wireless” tab in the settings menu. Your Wi-Fi network’s SSID can be changed to any name you choose, and a new password can be set.
Step 9: Click the “Security” tab and choose the appropriate option if you want to enable security features like WPA2 or WEP.
Step 10: Select the “Advanced” tab and customize the settings as needed for advanced options like port forwarding or DMZ.
Step 11: After modifying the settings, be sure to click “Save” to keep your modifications.
All done! Your Airtel 4G hotspot router has been set up and configured successfully. You can now access the internet seamlessly from anywhere and at any time.
How To Login Airtel Router?
You must adhere to these easy steps to log into your Airtel router:
Step 1: Verify that your device is linked to the Wi-Fi network of the Airtel router. You can accomplish this by connecting to the Airtel router’s network after searching for available Wi-Fi networks on your device.
Step 2: On your device, launch a web browser and type “192.168.1.1” into the address bar. The routers from Airtel have this as their default IP address.

Step 3: You will be directed to the login page of your Airtel router. The router’s default username and password should be entered. Normally, the router’s back or the accompanying manual will have this information printed on it.
Step 4: To access the router’s settings page after entering your login information, click the “Login” or “Submit” button.

Step 5: You are now logged in to your Airtel router and can customize the settings according to your preferences. Changes can be made to the SSID and password, security settings, and advanced configurations like port forwarding and DMZ.
Step 6: To make sure your changes are applied to your router, remember to save your changes before leaving the settings page.
There you go! You can easily log in to your Airtel router and change its settings to suit your needs by following these easy steps.
Airtel Thanks App (iPhone / Android):
Step-By-Step Guide To Use The Airtel Thanks App On iPhone or Android:
Step 1: Download the Airtel Thanks app from the Google Play Store (for Android) or App Store (for iPhone).
Step 2: Open the app on your device after it has been installed.
Step 3: Enter your Airtel mobile number and click “Proceed” if you are an Airtel customer. By selecting the “I’m not on Airtel” option, non-Airtel users can still use the app.
Step 4: Your registered mobile number will receive an OTP (One Time Password). For the app to verify your account, enter the OTP.
Step 5: Once your account is verified, you’ll be taken to the home screen of the Airtel Thanks app. You can use this page to access a number of features, including mobile phone recharge, bill payment, account balance check, and transaction history.
Step 6: Choose the appropriate option from the home screen and fill out the necessary information to recharge your phone or pay bills.
Step 7: Click the “My Account” tab at the bottom of the screen to view your transaction history or to check your account balance. Additionally, you can update your personal information, add or remove services, and manage your account settings here.
Here’s How To Access Airtel Thanks Website On A Computer:
Step 1: Launch your computer’s web browser and navigate to the Airtel website.
Step 2: Click on the “Login” button at the top right corner of the page.
Step 3: Enter your Airtel mobile number and click on the “Generate OTP” button. An OTP (One Time Password) will be sent to your registered mobile number.
Step 4: Enter the OTP in the space provided and click on the “Submit” button.
Step 5: Once you are logged in, you will be taken to the Airtel Thanks website home page. Here, you can access various features such as recharge your mobile, pay bills, check your account balance, and view your transaction history.
Airtel WIFI Router: Price, Plans, IP Address & more
A variety of WiFi routers are available from Airtel, with the Airtel 4G Hotspot Router starting at about 2,180 INR. Depending on sales and promotional offers, the cost of the routers may change. For its WiFi routers, Airtel also offers a variety of plans with various data caps and validity times.
The plans offer users flexibility based on their usage requirements, with options ranging from daily to monthly and even annual options. The admin panel of an Airtel WiFi router can be accessed and the necessary configurations can be made using the router’s default IP address, which is typically 192.168.1.1.
Reset Airtel Router To Default Settings?
Locate the reset button on the back of the router and press it with a pointed object like a pin or paperclip to restore an Airtel router to its factory default settings. Hold it down for a brief period of time to force a router restart and return default settings. This may be helpful if there are problems with the configuration or the router’s operation.
Step-by-step guide on how to change Wifi password and name

Step 1: Open a web browser and enter the default IP address (typically 192.168.1.1) to access the Airtel router’s admin panel.
Step 2: Enter the default username and password to access the admin panel.
Step 3: Locate the options to modify the WiFi name and password under the Wireless Settings tab.
Step 4: Fill out the fields with your new WIFI name and password.
Step 5: Save the changes and wait for the router to reboot.
Step 6: Use the new WiFi name and password on your connected devices to reconnect to the router.
You can quickly change the WiFi name and password on your Airtel router by adhering to these easy steps.
Conclusion
By following the step-by-step guide provided, users can easily know how to login Airtel router and access the router’s admin panel and make necessary configurations, such as changing the WIFI password and name, checking the connected devices, and updating firmware.
The router’s login information must be kept confidential, and a new password should be set in order to increase security against unauthorized access. Users can ensure optimal performance and a secure network connection by routinely checking the router’s settings.

I am a Chandan Tewatia and I am the founder of this blog cfindia.net. I have been in the industry for over 10 years and have worked with some of the biggest names in the business. I have a wealth of experience and knowledge to share, and my blog is a platform for me to do just that.
