Do you want to save something you have opened on your screen to show someone later? There are plenty of ways to capture screenshots on your Lenovo computer, laptop, and tablet. Sometimes you probably need to take screenshots and annotate files.
Whether you want to capture some portion of exactly what’s displayed on your screen, a website, a PDF, or any image, taking a screenshot and adding annotations like arrows, boxes, ovals, highlights, and more can be tricky most of the time.
Hence the ease of use and its access, along with its overall simplicity of screenshots, have made them one of the handiest technology features.
It has helped speed up work efficiency keeping proof of all the wild stuff you see on the internet and many more. Hence below are some information and steps on how To Take Screenshots on Lenovo laptops.
Different Methods To Take Screenshots On Lenovo laptop:
There are plenty of ways to take a screenshot on your Lenovo laptop. However, some only work with Windows 10, whereas others work with any version of Windows. If your Lenovo laptop has Windows 10 installed, you can take a screenshot using any of the following two methods.
Option 1:
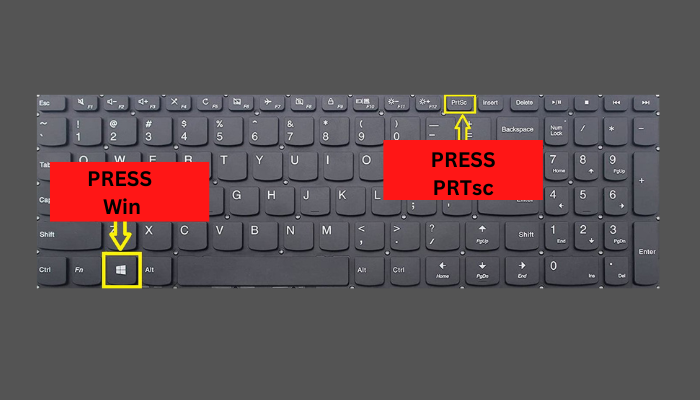
- First, hold on to the Windows key.
- After that, you need to press the PrtSc key present on the laptop
- For a moment, the screen will dim.
- A screenshot will be taken and saved in the Screenshots folder in your files.
Option 2:
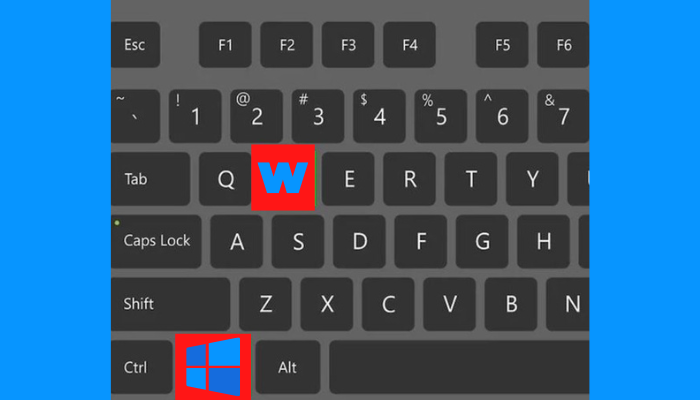
- First, as usual, hold down the Windows key.
- After doing so, press the W key.
- On the right side of the screen, a sidebar menu will appear.
- From the menu, select ScreenSketch.
- At this point, you can make any edits or changes you would like to the image.
- After you are done making the changes, press Save.
In case your Lenovo laptop operates using a different version of Windows, then follow these steps:
- First, press the PrtSc key present on your keyboard.
- After that, open Paint.
- After opening Paint, select paste.
- To make any markups, use the tools in Paint.
- Click on File and save the File.
Hence these were some ways to take a screenshot on Lenovo laptops.
Method 1 – Using The Default Option Provided By Windows
1. How To Take Print Screen Lenovo Laptop:
To take a screenshot using a print screen, follow the steps given below:
- Press the Windows button and Prtscr simultaneously:
The Print Screen key could be in the upper right corner (next to the Delete key) or the lower right (next to the arrow keys), depending on your own Lenovo laptop.
Hence this is considered the fastest and easiest method for taking screenshots on a Lenovo laptop. You can use this method if you have Windows 10 or 11 and also on any Lenovo computer or laptop.
- To find your screenshot, go to the Pictures folder:
Pictures captured using the above method are stored in a location like “C:\Users\username\Pictures\Screenshots.”
In Case You Can’t Find It There, Then.
- Try to open a program like Paint and press Ctrl + V to paste the image that has been copied to your clipboard.
- You can also use Alt + PrtSc to take a screenshot of your current window. After that, open Paint and paste the screenshot. Finally, save it by going to File> Save.
- If you have pressed the PrtSc without the Win key, you will open the Snip & Sketch tool instead.
2. How To Use Snipping Tool On Lenovo Laptop:
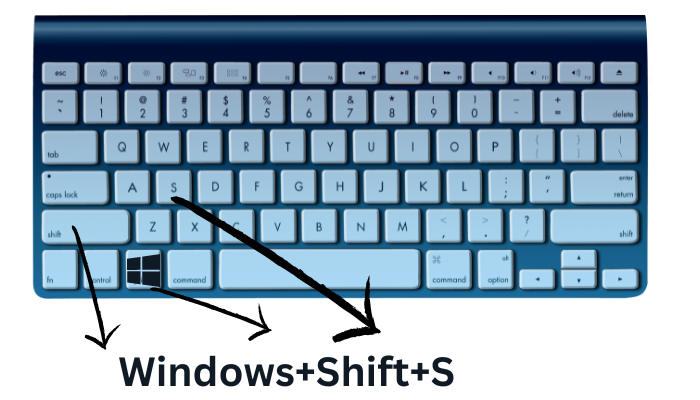
To use the snipping tools with shortcuts, follow the steps given below:
- It would help if you pressed the Window + Shift + S button at the same time:
Doing so will prompt the Windows Snipping Tool to open so that you can capture the screen successfully.
- Make use of your mouse to select everything if you want to capture all the thing that is present on your screen:
If you do not want to capture the entire screen, you can select the portion you want to take the screenshot of.
- To paste the capture, Open Paint and press Ctrl + V:
After you have completed pasting the picture successfully, you can save it by going to File>Save.
3. How To Use The snip And Sketch Tool On Lenovo Laptop:
To use the snip and sketch tool on your Lenovo Laptop to take a screenshot, follow the steps given below:
- First, go and open Snip & Sketch:
To do this, you must press the Win key and type Snip & Sketch. After doing so, click on the app search result. The Snipping Tool will open with a warning window asking you to use the new Snip & Sketch app instead. The nip & Sketch features a sketch tool that will be super useful if you want to markup the screenshot before sharing it.
- After the above step, click on New:
Clicking on New will move the Snip & Sketch window allowing you to capture a screenshot. If you are not immediately ready to take a screenshot, you can click the down arrow next to New and then select an option like Snip in 10 seconds.
- Select a mode:
At the top corner of your screen, you will see five icons, Rectangular snip, freeform snip, window snip, fullscreen snip, and close snipping. Click the mode that you use.
- After selecting mode, take a screenshot:
Depending on your chosen mode, you need to take screenshots in different ways. For the rectangular and freeform snip, you need to use your mouse to select the screen area you want the screenshot of. For window and fullscreen snips, click the screen area you want to capture. In this way, your screenshot will appear in the Snip & Sketch window, allowing you to make an edit and save it.
- After editing, save your screenshot:
You can use the icons above your screenshot preview if you want to edit them by highlighting areas, drawing on them, or cropping the image. After that, click the save icon from the lower right corner. From there, choose a save location in your File Explorer and save it.
4. How To Use Buttons On A Tablet To Capture A Screenshot:
- To take a screenshot, press and hold the On/Off and Volume Down buttons simultaneously:
These screenshots will be saved in your Pictures folder inside a folder named Screenshots. If you are using a tablet and can’t press buttons, then head to the Notifications Center in the taskbar. After that, select Screen snip. Snip & Sketch will open, allowing you to take a screenshot.
Method 2 – Using Third-Party Tools
1. Using Snagit

If you want to take your screenshot more easily and quickly and if you want to edit your image with the help of more powerful tools, then you must use Snagit. Follow the instructions mentioned below to take a screenshot using Snagit.
- The first and most crucial step is to download and install Snagit.
- After running and signing into Snagit, click on the Capture button.
- Click and drag your mouse button to select a custom area. After it is done, release the mouse button.
- To capture the selected area, click the camera icon.
- On the pop-up Snagit Editor, edit your screenshot. You can add shapes, text, and effects and adjust your screenshot.
- To save your screenshot, press Ctrl + Save on your keyboard.
Hence in this way, you can successfully capture a screenshot. (Source)
2. Using Lightshot

With Lightshot, one can create minimal screenshots that are lightweight and easy to use. Hence the steps to take a screenshot using Lightshot are:
- First, download and install the light shot application from the official website.
- After installing the application, you can easily take a screenshot on your Lenovo laptop by pressing the Print Screen key on your keyboard.
- After opening this software, click on the icon to select the area you want to take the screenshot of.
- After taking the screenshot, save it into a USB or external drive with a .png file extension.
Frequently Asked Questions:
How to screenshot on Lenovo if you have Windows 10. Hold down the Windows key, then press the PrtSc key. The screen will dim for a moment, and the image on your monitor will save to the Screenshots folder in your Picture Files.
Windows 10. Depending on your hardware, you may use the Windows Logo Key + PrtScn button as a shortcut for the print screen. If your device does not have the PrtScn button, you may use Fn + Windows logo key + Space Bar to take a screenshot, which can then be printed.
Conclusion:
Therefore this is everything you need to know on how To Take Screenshots on Lenovo laptops. If you want to make the most out of your screenshots and communicate through them effectively, you can use software like Lightshot, Snagit, and many others.
Lenovo laptops and computers have various built-in operations that allow you to capture screenshots. However, they won’t be as fun and efficient as using a tool that will let you edit, highlight, and annotate your images.

I am a Chandan Tewatia and I am the founder of this blog cfindia.net. I have been in the industry for over 10 years and have worked with some of the biggest names in the business. I have a wealth of experience and knowledge to share, and my blog is a platform for me to do just that.
